

How To Hang Canvas Wall Art: Easy Steps For Drywall & Studs
You finally picked the perfect canvas piece, now it needs to go up on the wall without drama. Knowing how to hang canvas wall art the right way matters more than most people think. A crooked frame or a nail that rips through drywall can turn an exciting moment into a frustrating one. The good news? It's straightforward once you know the basics.
Whether you ordered a single statement piece or a multi-panel set from Yourwallarts, every canvas print ships with a built-in hanging system ready to go. But the wall side of things, finding studs, choosing the right hardware, picking the perfect height, that's on you. And that's exactly what this guide covers.
Below, you'll find clear, step-by-step instructions for hanging canvas art on drywall and studs, plus damage-free alternatives for renters or anyone who'd rather skip the drill. We'll also walk through placement tips and spacing tricks for single and multi-panel displays so your wall art looks intentional, not improvised.
What to plan before you drill or stick
Before you touch a drill or peel an adhesive strip, a few minutes of planning saves you from patching holes and re-hanging the same piece twice. The wall type, the canvas weight, and the mounting hardware all need to match before anything goes on the wall. Skipping this step is the most common reason canvas art ends up crooked, too low, or pulling away from the wall over time.
Know your wall type
Most homes in the US have drywall (also called gypsum board), but some older homes have plaster, and some spaces have concrete or brick behind the surface. Each wall type behaves differently when you drive a nail or anchor into it. Drywall alone can hold a lightweight canvas with a simple picture-hanging nail, but for anything heavier or larger, you'll want to hit a wall stud for a secure, lasting hold.
If you're unsure whether you have drywall or plaster, knock on the wall. Drywall sounds hollow; plaster sounds dense and solid.
You can locate studs with a stud finder (a basic magnetic or electronic model works fine) or by knocking across the wall and listening for the sound to shift from hollow to solid. Studs sit 16 or 24 inches apart in most US homes, so once you find one, you can measure out from there to find the rest.
Check the canvas weight and backing
Canvas weight varies more than most people expect. A compact 40x60 cm print weighs very little, while an 80x120 cm canvas on a thick wooden stretcher frame can weigh 8 to 12 pounds or more. Yourwallarts canvases ship with a built-in hanging system already on the back, so you won't need to add D-rings or sawtooth brackets yourself. What you do need to confirm is the total weight so you can match it to hardware rated for that load.
Flip the canvas over before you commit to any plan. Look at what's already mounted on the back: a wire, a sawtooth bar, or keyhole slots will each call for a slightly different wall setup. Knowing this before you leave for the hardware store means you buy the right thing once instead of making two trips.
Gather your tools before you start
Having everything lined up in front of you before you begin is what separates a clean install from a stop-and-start mess. Below is a quick checklist of what you'll typically need when figuring out how to hang canvas wall art:
- Tape measure
- Pencil
- Level (a small torpedo level works well)
- Stud finder
- Hammer or drill, depending on your chosen hardware
- Picture-hanging nails or wall anchors
- Painter's tape (useful for mapping out placement before committing)
Step 1. Choose the height and layout
Choosing the right height and layout before you pick up a tool is the part most people skip, and it's what leads to holes in the wrong spot. Getting placement right the first time saves you from filling and repainting, and a few minutes of planning upfront makes the finished result look intentional from the start.
The right height for a single canvas
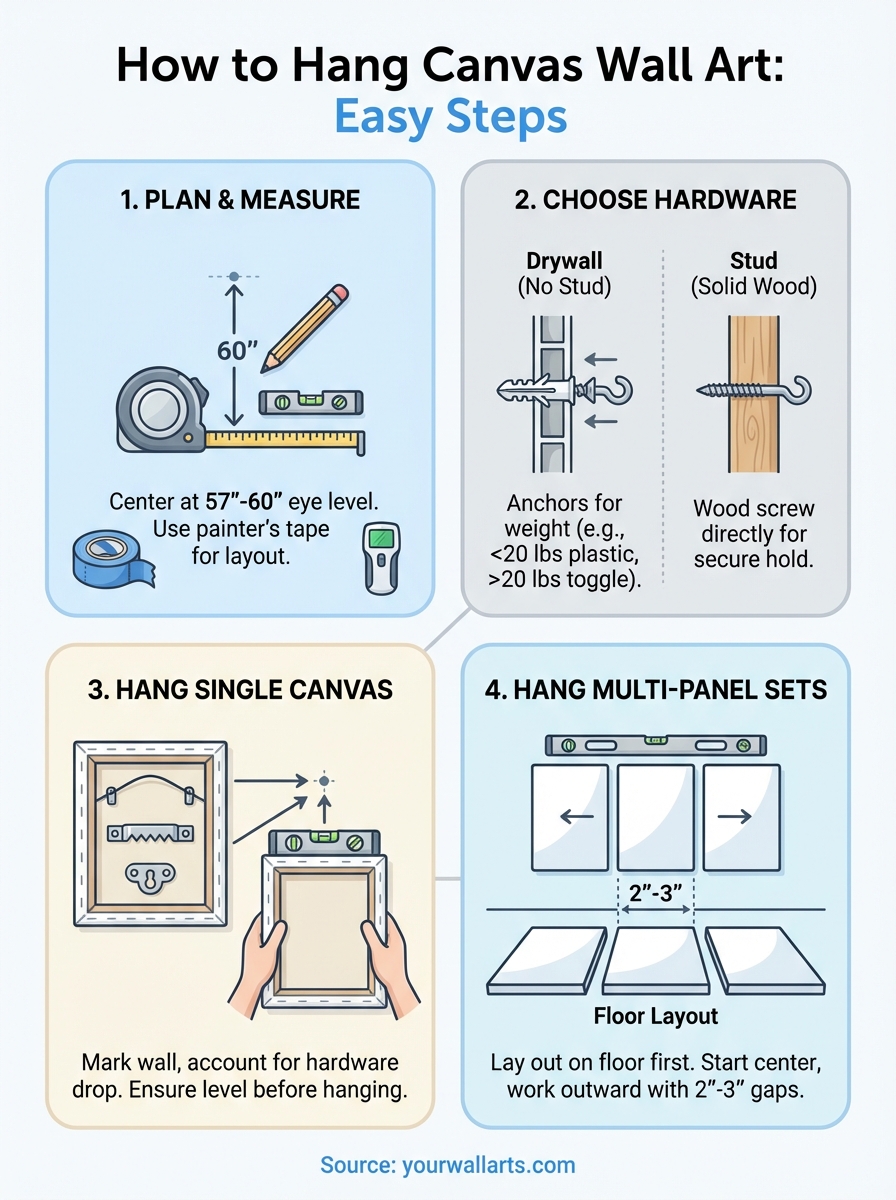
The standard recommendation for hanging wall art is to position the center of the piece at eye level, which sits at roughly 57 to 60 inches from the floor. This is the guideline most galleries and interior designers follow because it places the focal point at a comfortable viewing height for the average adult standing in the room.
Measure from the floor up to 58 inches, mark that point with a pencil, and use that mark as the center of your canvas rather than the top edge.
When the canvas will hang above furniture such as a sofa or console table, drop the center height slightly. Aim for 6 to 8 inches of space between the top of the furniture and the bottom edge of the canvas to keep the art visually connected to the piece below it rather than floating loose on the wall.
Planning a layout for multiple pieces
If you're working out how to hang canvas wall art as a set or gallery wall, treat the entire grouping as one visual unit rather than placing each piece independently. Lay all the canvases flat on the floor first to test different arrangements before you commit anything to the wall.

Use painter's tape to outline each piece directly on the wall at your planned positions. This lets you step back, check the spacing, and adjust without permanent marks. Aim for 2 to 3 inches of gap between panels for a clean, cohesive look that reads as a deliberate set.
Step 2. Pick the right hardware for your wall
Knowing how to hang canvas wall art the right way starts with matching the hardware to your specific wall type. The wrong choice, like a small nail driven into bare drywall, can pull free under the weight of a larger piece. The right combination of anchor, screw, or hook keeps your canvas firmly in place for years without drama.
Drywall without a stud
If your chosen hanging spot doesn't land on a stud, you need a drywall anchor to spread the load across the wall material. For canvases under 20 pounds, a self-drilling plastic anchor with a matching screw handles the job cleanly. For heavier pieces, step up to a toggle bolt or a metal Molly bolt rated for the full weight of your canvas.

Never rely on a bare nail driven into plain drywall for anything heavier than a very lightweight frame - it will work its way loose over time.
| Canvas weight | Recommended hardware |
|---|---|
| Under 5 lbs | Picture-hanging nail (1 to 2 nails) |
| 5 to 15 lbs | Self-drilling plastic anchor + screw |
| 15 to 30 lbs | Toggle bolt or Molly bolt |
| 30+ lbs | Stud mounting required |
Hitting a stud or masonry wall
When you can position your hook directly over a wall stud, a standard wood screw that is 1.5 to 2 inches long is all you need. For concrete or brick walls, use a masonry drill bit and a masonry anchor designed for that surface. Both setups deliver far more holding strength than any drywall-only solution.
Renters or anyone skipping permanent holes should consider heavy-duty adhesive strips rated for the full canvas weight. These work reliably for lightweight to mid-weight pieces on smooth, painted walls as long as you follow the weight limits printed on the packaging.
Step 3. Install and hang a single canvas
With your height marked, your hardware selected, and your tools ready, you're at the point where knowing how to hang canvas wall art turns from planning into action. Moving carefully through each sub-step keeps the process clean and means you won't need to fill and repaint any misplaced holes. Rushing through the marking stage is where most people lose time, so take an extra minute here.
Mark the wall accurately
Before you drive anything into the wall, you need to transfer measurements from the canvas to the wall with real precision. Hold the canvas against the wall at your desired position and mark the center point lightly with a pencil. Then flip the canvas over and measure the distance from the top edge of the frame down to the hanging hardware on the back, whether that's a wire, a sawtooth bar, or a keyhole bracket.
Subtract that back-hardware measurement from your center-height mark (58 inches from the floor) to find the exact spot where your nail or screw needs to go.
Use a torpedo level to draw a short horizontal reference line through your mark. This confirms your hanging point is level even if the floor beneath you isn't perfectly flat.
Drive the hardware and hang the canvas
Once your mark is confirmed, install your chosen hardware using the method that matches your wall type from Step 2. Follow these steps in order for a clean, secure result:
- Drive the nail, screw, or anchor straight into your pencil mark, keeping picture nails angled upward at roughly 45 degrees to improve holding strength.
- Leave the nail or screw head protruding 3 to 4 millimeters from the wall so the canvas hardware has a surface to rest on cleanly.
- Lift the canvas, hook the back-mounted hanging system onto the nail or screw head, and let it settle into position.
- Lay your level across the top edge of the frame and adjust gently until the bubble sits centered, then step back to confirm the overall position looks right.
Step 4. Hang sets and multi-panel canvases
Hanging a set of canvases follows the same core principles as a single piece, but alignment between panels becomes the main challenge. Whether you're working with a two-panel set or a five-piece gallery wall, the goal is to make the grouping read as one unified composition rather than a collection of individual pieces placed near each other.
Map out the full arrangement first
Before you mark a single point on the wall, lay all panels flat on the floor in your planned arrangement. Measure the total width and height of the full grouping, including the gaps between panels, so you know exactly how much wall space the set will occupy. This helps you center the arrangement and confirm the overall scale works with the furniture or space below it.
A consistent gap of 2 to 3 inches between panels gives a clean, intentional look that works for most room styles.
Use painter's tape on the wall to outline each panel's position before you drive any hardware. Once the tape layout looks right from a few feet back, you're ready to mark and install.
Install panels from the center outward
When you know how to hang canvas wall art as a single piece, applying that process to a set works best when you start with the center panel or the top row and work outward from there. This approach keeps the grouping balanced and prevents accumulated spacing errors from pushing the last panel out of position.
Follow this order for a clean result:
- Mark and hang the center or anchor panel first.
- Measure outward to each adjacent panel using your planned gap measurement.
- Use a level across the top edges of neighboring panels to confirm they sit at the same height.
- Hang remaining panels in sequence, checking alignment after each one before moving to the next.
Quick recap and next step
Knowing how to hang canvas wall art comes down to four repeatable steps: plan before you drill, set your height and layout, match the hardware to your wall type, then install with a level in hand. Following this sequence keeps you from filling unnecessary holes and gives your finished wall a clean, deliberate look. Whether you tackled a single piece or a full multi-panel set, the process stays consistent each time you add something new to your walls.
Now that you have the method down, the next move is finding pieces worth putting up. Yourwallarts carries premium canvas prints in sizes from 40x60 cm to 80x120 cm, each one made to order and shipped with a built-in hanging system already on the back. Browse the full collection at Yourwallarts and find the art that fits your space.