

How To Hang Wall Art In Living Room: Height & Spacing
You finally picked the perfect piece, maybe a dramatic canvas or a sleek acrylic glass print, and now it's sitting against your wall, waiting. The difference between art that looks placed and art that looks professional comes down to how you hang wall art in living room spaces. A few inches too high or too low, and the whole room feels off. Get the height and spacing right, and suddenly everything clicks.
This guide covers the exact measurements and techniques you need to hang wall art like a designer would. We'll walk through ideal hanging heights, spacing rules for gallery walls, placement relative to furniture, and methods that work with or without nails. Whether you just ordered your first piece from Yourwallarts or you're rearranging an entire collection, this is the only reference you'll need to get it right the first time.
What to decide before you start
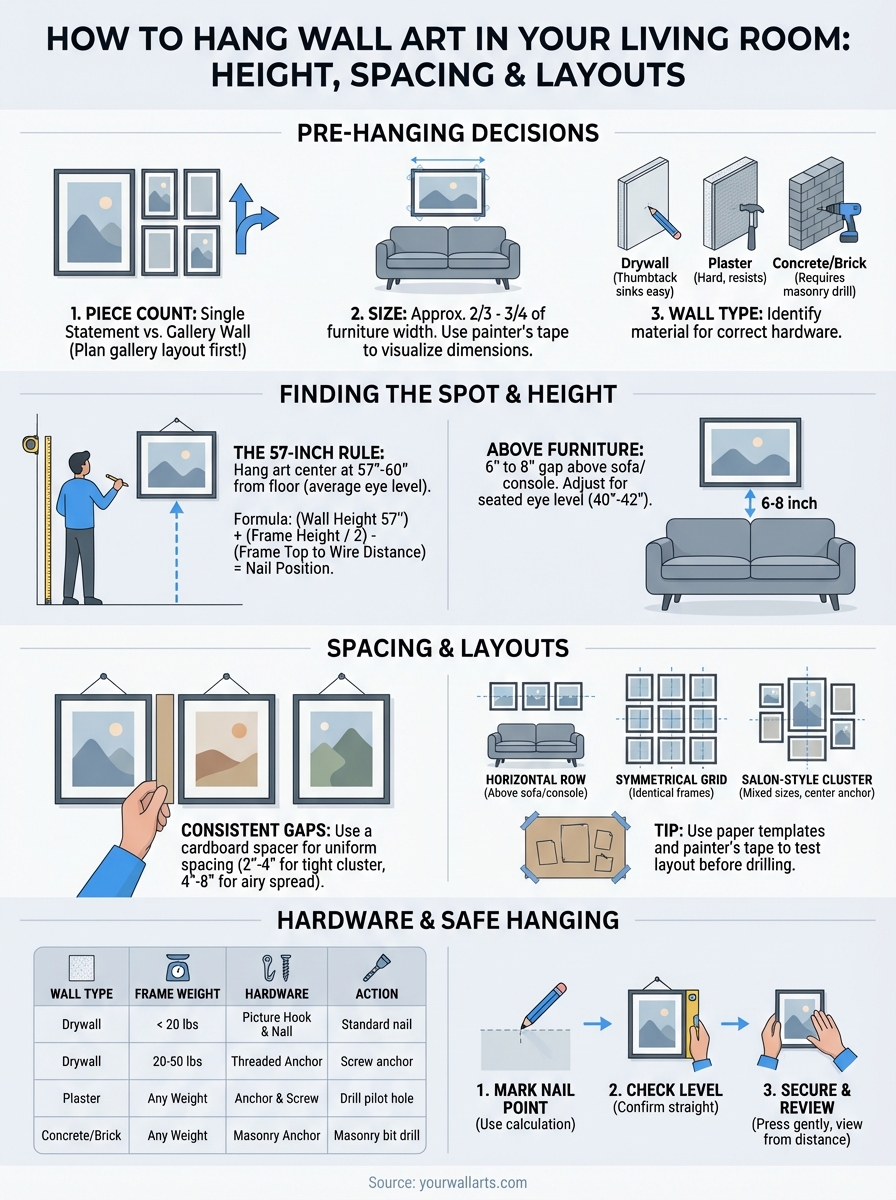
Before you pick up a hammer or measure a single inch, you need to make three decisions that will shape every choice that follows. Rushing past this stage is the most common reason people end up with art that looks off even after they technically hung it at the right height. Spending five minutes here saves you from patching extra holes in your wall later.
How many pieces you're hanging
The most important fork in the road when figuring out how to hang wall art in living room spaces is whether you're working with one statement piece or a multi-piece gallery arrangement. A single large print follows a straightforward centering process. A gallery wall of three, five, or more pieces works differently: you need to plan the entire layout as one visual unit before a single nail goes in, which changes your measurements completely.
Settle this question first, because every spacing and height calculation in the steps below depends on it. If you're unsure, lay all your pieces on the floor in front of the target wall and experiment with arrangements until one feels right. What you see on the floor translates almost directly to what you'll see on the wall.
A single large piece almost always creates more visual impact than several small ones scattered across the same wall.
The right size for your wall and furniture
Art that is too small for its wall looks forgotten, like a postage stamp on a blank page. Art that is oversized can feel aggressive and crowd the room. A reliable sizing rule for furniture-anchored art: your piece or arrangement should span roughly two-thirds to three-quarters of the furniture's width beneath it. For a blank wall with no furniture anchor, err on the larger side rather than the smaller.
Before you commit to a size, grab a tape measure and use painter's tape to outline the art's dimensions directly on your wall. Step back to the opposite side of the room and look at it. This takes two minutes and eliminates most sizing mistakes before they happen.
Your wall type and hanging method
Wall material controls your hardware choices more than anything else, so identify yours now. Standard drywall accepts picture hooks and anchor screws with minimal effort. Plaster is harder and more brittle, requiring a slower approach to avoid cracking. Concrete or brick walls need masonry anchors and a drill fitted with a masonry bit.
A quick way to identify drywall: press a thumbtack into an out-of-sight spot. It sinks in with light hand pressure. Plaster resists and feels noticeably harder. Knowing your wall type before you shop means you buy the right hardware in one trip instead of making two.
Step 1. Choose the wall zone and focal point
Every room has a natural anchor: a fireplace, a large window wall, the sofa wall in a seating area, or the first wall you see when you walk in. Art placed on that anchor wall commands attention and ties the room together. Putting it anywhere else first risks making the space feel unbalanced, no matter how well you hang it.
Find your room's natural focal point
Stand at your living room entrance and note where your eyes land first. That spot is your primary focal point, and it is almost always the best candidate for your main piece or gallery arrangement. If the room has a fireplace, that wall wins by default. If not, the wall directly facing the main seating area is your next strongest option.
Placing art on your room's focal point wall creates a sense of intentional design rather than decoration that was added as an afterthought.
Use this checklist to confirm your focal point wall before you commit:
- It is the first wall visible from the room entrance
- It sits directly in your sightline when you are seated on the sofa
- It has minimal interruptions like doors, outlets, or light switches
- It receives consistent lighting, whether natural or artificial
Map out the wall zone before you hang anything
Once you identify the right wall, narrow your focus to the specific zone within it. For a sofa wall, your zone sits directly above the furniture. For a blank wall with no anchor furniture, the zone is roughly eye-level center, between 57 and 60 inches from the floor to the mid-point of your art.
Knowing your zone ahead of time is what makes the next steps on how to hang wall art in living room spaces move quickly. You already know where to aim your measuring tape, which removes guesswork from every calculation that follows.
Step 2. Set the right height and size
Height is where most people go wrong when figuring out how to hang wall art in living room spaces. The standard rule exists for a reason: hang art so its center sits 57 to 60 inches from the floor, which matches the average standing eye level. This applies whether you're working with a single large canvas or the centerpiece of a gallery arrangement.
The 57-inch rule in practice
To apply the rule, measure from the floor up to 57 inches and mark that spot lightly with a pencil. That mark is where the center of your art should land. From there, use this sequence to find the exact nail position:
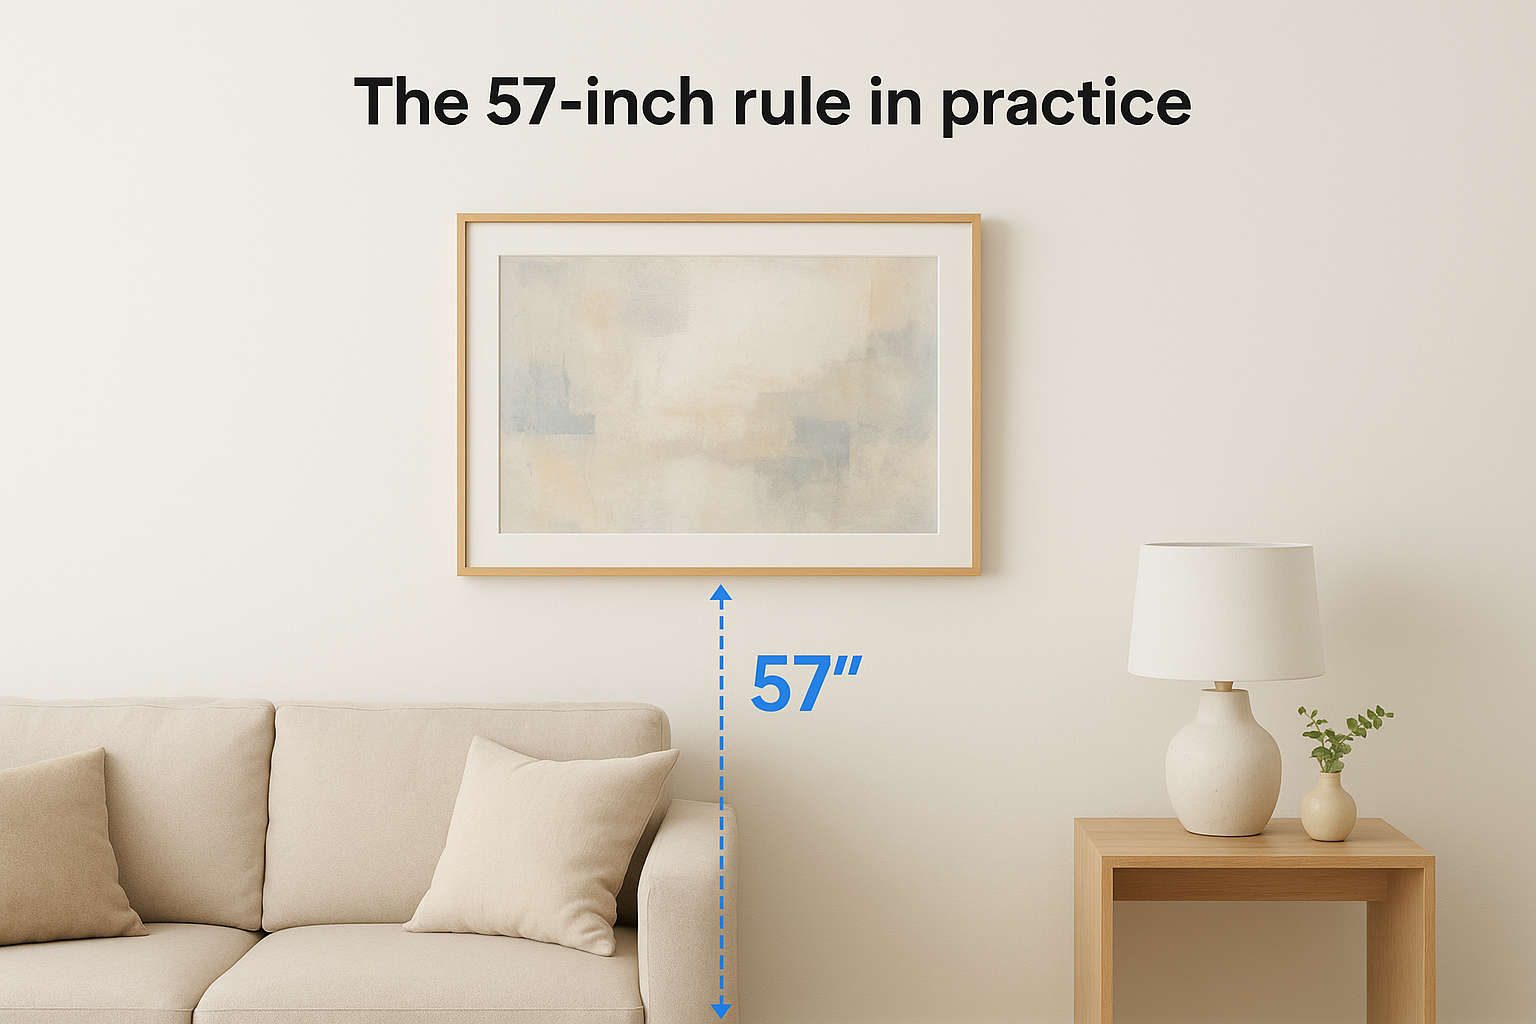
- Measure the full height of your piece.
- Divide that number by two to find the center point.
- Measure from the top of the frame down to the hanging wire or hook under tension.
- Add the result from step 3 to 57. That total is where your nail or anchor goes.
Getting this calculation right before you drill means you hang the piece once and never need to fill a misplaced hole.
Adjusting height when furniture sits below
When a sofa or console sits beneath your art, the 57-inch rule gives way to a furniture-relative measurement. Your piece should hang 6 to 8 inches above the top of the furniture, keeping a clear visual connection between the two without the art looking like it is floating on its own.
Check that relationship from a seated position, not standing. Seated eye level sits roughly 40 to 42 inches from the floor, and that is what matters most in a living room where people spend most of their time sitting. If your furniture is taller than 36 inches, close the gap to 4 to 6 inches instead so the art and the furniture still read as connected.
Step 3. Plan spacing and layouts
Spacing is what separates a polished gallery wall from a cluttered one. When you work out how to hang wall art in living room settings with several pieces, the gaps between frames carry as much visual weight as the art itself. Keeping those gaps consistent is the single biggest factor in making a multi-piece arrangement look intentional rather than random.
Set your gap measurement first
The standard gap between frames in a gallery arrangement is 2 to 4 inches for a tight, cohesive cluster or 5 to 8 inches for a more open, airy spread. Pick one number before you hang the first piece and use it everywhere. Cut a piece of cardboard to your chosen gap width and use it as a physical spacer between frames as you work. This removes guesswork and keeps every gap identical without constant re-measuring.
Smaller frames with less visual weight work best at 2 to 3 inches apart. Larger, heavier pieces can breathe a bit more at 4 to 5 inches without the arrangement losing its cohesion.
Use a paper template before drilling anything
Before a single nail goes in, trace each of your frames onto kraft paper or newspaper, cut the shapes out, and tape the full layout to your wall using painter's tape. This takes about 15 minutes and gives you a life-size preview you can shift, rotate, and adjust without any damage to your wall.

Three layouts that work reliably for most living rooms:
| Layout type | Works best for | Anchor point |
|---|---|---|
| Horizontal row | Above a long sofa or console | Center at 57 to 60 inches |
| Symmetrical grid | Identical frame sizes | Equal gaps on all sides |
| Salon-style cluster | Mixed sizes and shapes | Largest piece at visual center |
Commit to your layout on paper before you measure for hardware. Your anchor point and total spread width both depend on which format you choose.
Step 4. Pick hardware and hang it safely
The final step in knowing how to hang wall art in living room spaces correctly is choosing hardware that matches your wall type and frame weight. Using the wrong anchor for your wall material is the most common cause of art falling, and it is completely avoidable. Spend two minutes on the hardware decision, and your piece will stay put for years.
Match hardware to your wall and frame weight
Different wall materials require different anchors, and most hardware packaging lists weight ratings and compatible surfaces clearly. Use this table to match your setup:
| Wall type | Frame weight | Hardware to use |
|---|---|---|
| Drywall | Under 20 lbs | Standard picture hook with nail |
| Drywall | 20 to 50 lbs | Threaded drywall anchor + screw |
| Plaster | Any weight | Drill pilot hole first, then screw anchor |
| Concrete or brick | Any weight | Masonry anchor + masonry drill bit |
Acrylic glass prints and large canvases typically run heavier than they look. Always check the listed weight of your piece against the rated capacity of your hardware before you commit.
When in doubt, go one size up on your anchor rating. Overbuilding your hang point costs nothing and prevents damage to your wall and your art.
Drive the nail or anchor in three steps
Once you have the right hardware in hand, follow this sequence to avoid crooked hangs and unnecessary holes:
- Mark your nail point with a light pencil dot using the calculation from Step 2.
- Hold a level against the top edge of the frame after hanging to confirm it sits straight before you fully set it.
- Press the frame gently against the wall and release slowly to confirm it seats evenly on the hook or anchor.
Check the fit from across the room before you pack up your tools. Small adjustments take seconds now and become much harder once you've moved furniture back into place.
Quick recap and what to do next
Knowing how to hang wall art in living room spaces comes down to four decisions made in the right order. Decide on your piece count and wall type first, then find your focal point wall, apply the 57-to-60-inch center height rule, set consistent gaps between frames, and match your hardware to your wall material and frame weight. Each step builds on the one before it, so skipping ahead is what causes crooked frames and unnecessary holes.
Your tools are simple: a tape measure, a pencil, a level, and a cardboard spacer cut to your chosen gap width. None of this requires professional help or special skills, just the right sequence and a few careful measurements before you drive the first nail.
Ready to find a piece worth hanging? Browse the full collection of premium canvas and acrylic glass prints and pick something that makes your wall worth looking at.