
How To Hang Canvas Prints: Framed, Unframed, Damage-Free
So you've picked out the perfect canvas print, maybe a striking Viking scene or a moody dark fantasy piece, and now it's sitting against your wall, waiting. Figuring out how to hang canvas prints the right way matters more than most people think. A crooked frame or the wrong hardware can turn a gallery-quality piece into a frustration you'd rather not deal with.
Whether your canvas comes stretched and ready to hang, sits inside a frame, or arrives rolled up in a tube, each type calls for a slightly different approach. The method you choose also depends on your walls and how much damage (if any) you're willing to leave behind. At Yourwallarts, every canvas print ships with a built-in hanging system, but knowing the full range of options helps you get the best result no matter the situation.
This guide walks you through hanging framed canvases, unframed stretched canvases, and rolled canvases, plus damage-free alternatives for renters or anyone who'd rather skip the drill. By the end, you'll have the confidence to mount your wall art straight, secure, and exactly where you want it.
What to know before you hang a canvas print
Before you work through how to hang canvas prints step by step, it pays to understand what type of canvas you're working with and what your wall can safely support. Skipping this prep leads to the most common hanging mistakes: stripped anchors, cracked plaster, and prints that tilt within a day. Taking five minutes to assess both the art and the wall puts you in a much stronger position before you touch a hammer.
The three canvas types you might be working with
Stretched canvas mounts on a wooden inner frame called a stretcher bar, which gives it rigidity and structure. It can hang directly from a hook using the bar itself, a sawtooth hanger, or a built-in hanging system like the one included with every Yourwallarts canvas. Framed canvas adds a decorative outer frame around the stretched piece; that outer frame usually has D-rings or wire pre-installed on the back, which changes how you measure and mount. Rolled canvas has no support structure at all and needs either a stretcher bar assembly or heavy-duty adhesive strips before it can go on a wall.

| Canvas Type | Has Rigid Structure? | Common Hardware |
|---|---|---|
| Stretched canvas | Yes | Sawtooth hanger, D-ring, built-in hook |
| Framed canvas | Yes | Picture hook, wall anchor, wire |
| Rolled canvas | No | Stretcher bars, adhesive strips |
Know your wall type before you pick hardware
Standard drywall is the most common wall material in US homes, and a basic picture hook or drywall anchor handles most canvas prints under 20 lbs without any issue. Plaster walls, typical in homes built before 1960, are denser and more brittle; always drill a pilot hole first to avoid cracking the surface around your anchor. Brick and concrete walls require masonry drill bits and masonry anchors, which is a different process entirely.
Match your anchor's weight rating to at least 1.5 times the actual weight of the print. This gives you a real safety margin rather than a number that barely covers the load.
Tools to gather before you start
A tape measure and pencil are the two items you'll use most throughout the entire hanging process, so keep them within reach before you do anything else. You also need a level to confirm straight placement, plus a hammer or drill depending on your wall type. A stud finder is worth adding for any canvas wider than 24 inches or heavier than 15 lbs.
Quick tool checklist:
- Tape measure
- Pencil
- Level (a 9-inch level works for most prints)
- Hammer or power drill
- Stud finder
- Wall anchors rated for your print's weight
- Hanging hardware matched to your canvas type
Step 1. Pick the right spot and height
The spot you choose affects how the whole room feels, so stand back and look at the wall before you mark anything. Natural light sources and nearby furniture both influence which wall works best; a canvas above a sofa reads differently than the same piece hung on an empty wall between two windows.
Standard height rule
Most interior designers place the center of a piece at 57 to 60 inches from the floor, which aligns roughly with average eye level. When you hang canvas prints in a room with high ceilings, stick to this range rather than stretching the art upward to fill vertical space; the eye will find the right focal point on its own.
Measure from the floor to 58 inches and mark that spot in pencil first; that becomes your center-line reference for every calculation that follows.
Hanging above furniture
Furniture anchors the art visually, so the bottom edge of your canvas should sit 6 to 8 inches above the top of a sofa or console table. For a single piece centered above a sofa, find the midpoint of the sofa's width and work outward from there. If your canvas is notably narrower than the furniture beneath it, use the two-thirds rule: the art should span at least two-thirds of the furniture's width to look intentional rather than floating.
- Sofa at 84 inches wide: aim for art that spans at least 56 inches, or a grouping that covers that width together
- Console table at 48 inches wide: target art at 32 inches or wider for a balanced look
Step 2. Choose hardware for your canvas type
Hardware choice is the step most people rush, and it's where problems start. Matching the right fastener to your canvas type makes every other part of how to hang canvas prints much easier, and it's the single biggest factor in whether your print stays level for years or starts tilting within a week.
Stretched and framed canvas hardware
A stretched canvas with a built-in hanging system (like the ones Yourwallarts includes) needs only a single picture hook rated for the print's weight. If your stretched canvas uses a sawtooth hanger instead, one centered hook still works well for prints up to about 24 inches wide. Wider or heavier pieces benefit from two D-rings with picture wire strung between them, which distributes the load across two wall points instead of one.
Framed canvases almost always have D-rings pre-installed on the back. Run a length of picture wire through both rings and leave a little slack so the wire forms a slight arc. That arc is what actually rests on your hook or hooks.
Use picture wire rated for at least twice the weight of your framed piece; wire rated right at the limit can fray and fail over time.
Damage-free options
Adhesive strips like 3M Command strips work well for stretched canvases up to about 16 lbs, provided you clean the wall surface first and press firmly for 30 seconds during installation. Apply matching strips to both the back of the canvas and the wall, then connect them before pressing the canvas into its final position. These are the best choice for renters or anyone working with painted drywall where holes are off the table.
Step 3. Measure, mark, and install anchors or hooks
Getting the measurement right before you touch the wall is the step that separates a straight, secure installation from one you'll redo twice. Accurate marks take less than three minutes but save you from patching extra holes. This is where knowing how to hang canvas prints properly really shows up in the final result.
Find the hanging point on the back of your canvas
Flip your canvas face-down on a soft surface to protect the print. For a sawtooth hanger or built-in hook, measure the distance from the top edge of the canvas down to the center of the hanger. For picture wire, pull the wire up toward the top of the frame until it's taut, then measure from the top edge down to the highest point of the wire under tension. Write that number down; this is your offset measurement.
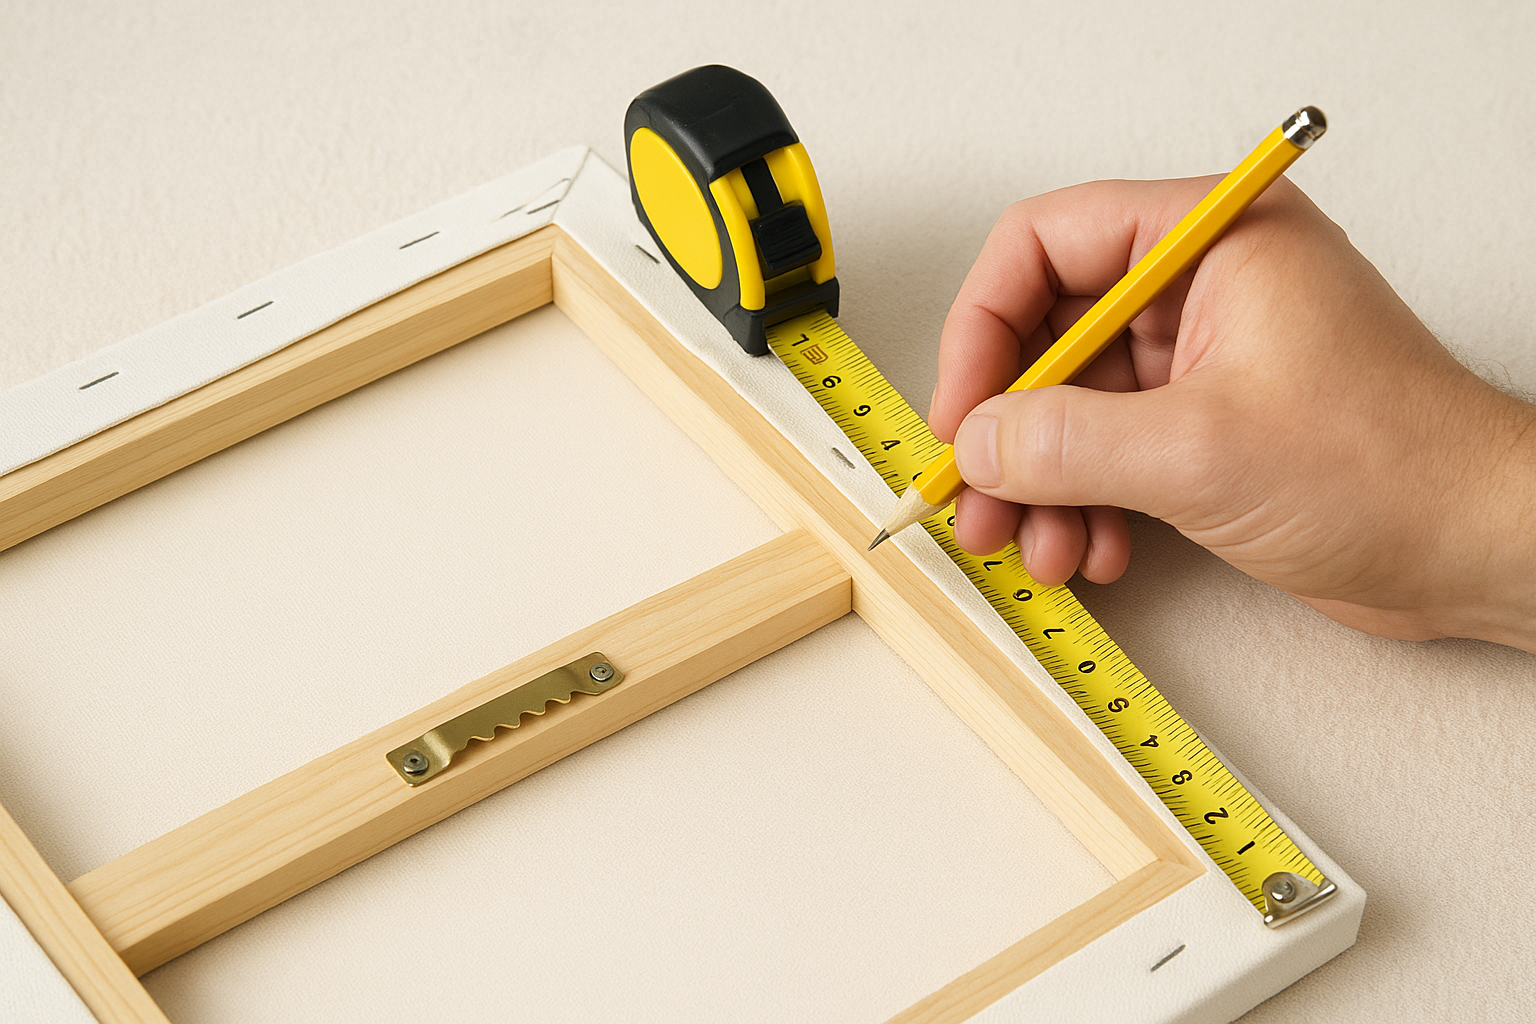
Your offset measurement tells you exactly how far below your pencil mark on the wall the top of the canvas will sit, so double-check it before drilling anything.
Transfer the measurement to the wall
Take your center-line mark from Step 1 (the 57-to-60-inch height reference) and subtract your offset measurement from it. That result is where your hook or anchor goes. Mark that point clearly with a pencil, then use your level to confirm the spot is horizontally centered relative to the space you mapped in Step 1.
Drive the anchor or hook
For standard drywall, press a picture hook nail in at a 45-degree angle into a stud, or tap in a self-drilling drywall anchor if you're between studs. For plaster, drill a small pilot hole first to prevent cracking, then insert your anchor before threading in the screw. Give the hook a firm tug to confirm it holds before you move to the next step.
Step 4. Hang, level, and fine-tune
With your hook or anchor set, you're ready to lift the canvas onto the wall. Lift from the sides, not the corners, to avoid warping the stretcher bars, and set the hanging hardware onto the hook with a slow, controlled motion. This is the final step in how to hang canvas prints, and taking thirty extra seconds here prevents a frustrating redo.
Check level before you let go
Hold the canvas in place and place your level along the top edge before releasing your grip. A small bubble shift tells you which side to nudge. If you're using picture wire on two hooks, adjusting the wire left or right on one hook corrects most tilt issues without touching the wall again.
Check the level from a distance of about five feet after your initial check; small tilts are easier to spot from farther away than they are up close.
Fix gaps and pressure points
Step back and look at the top corners of the canvas after it's level. If one corner pulls away from the wall, the wire has too much slack or the hooks sit at uneven heights. Re-measure the hook heights and adjust the lower one up by the exact gap you see. For adhesive strip installations, press each strip firmly against the wall for a full 30 seconds after placement, then wait the manufacturer's recommended cure time (usually one hour) before loading the canvas onto the strips.
- Tilt left: slide wire left on right hook
- Tilt right: slide wire right on left hook
- Top corner gap: raise the lower hook by the exact gap measurement

Quick wrap-up
Now you know exactly how to hang canvas prints of any type, whether you're working with a stretched piece, a framed canvas, or a damage-free adhesive setup. The process comes down to four straightforward steps: assess your wall and canvas type, pick the right spot and height, match your hardware to the job, and transfer your measurements accurately before you drive a single hook. Each step builds on the last, and skipping any one of them is where most hanging problems start.
Your canvas deserves a wall that does it justice. If you still need the right piece to fill that space, browse the full collection at Yourwallarts, where every canvas ships ready to hang with a built-in hanging system and free shipping included. Pick your size, choose your finish, and you'll have a print on your wall within days.
Shop Canvas Prints to Hang at Yourwallarts
Now that you know how to hang your canvas prints perfectly, it's time to find the right piece. Browse our collections of premium canvas and acrylic glass prints — made to order and shipped free worldwide.
- Abstract Canvas Prints — Bold abstract art ready to hang in any room, in canvas or acrylic glass.
- Nature & Landscape Canvas Prints — Stunning landscape scenes, perfect as a single statement piece or a gallery wall.
- Botanical & Floral Canvas Prints — Light, elegant flower art that works above beds, sofas and hallway consoles.
- Black & White Wall Art — Classic monochrome prints that look sharp in minimalist and traditional interiors.
- Seascape Canvas Prints — Calming ocean prints that add a tranquil focal point to any wall.
All Yourwallarts prints are made to order on premium canvas and acrylic glass. Free shipping and 30-day returns on every order.